
How I Built The Strapi Breakout Easter Egg
Written by: Cameron Paczek
Published on: February 25, 2023
Table Of Contents
- Table Of Contents
- Introduction
- First Iteration
- Creating the Particle Logo
- Building Breakout
- Hacking Strapi Breakout
- Conclusion
Introduction
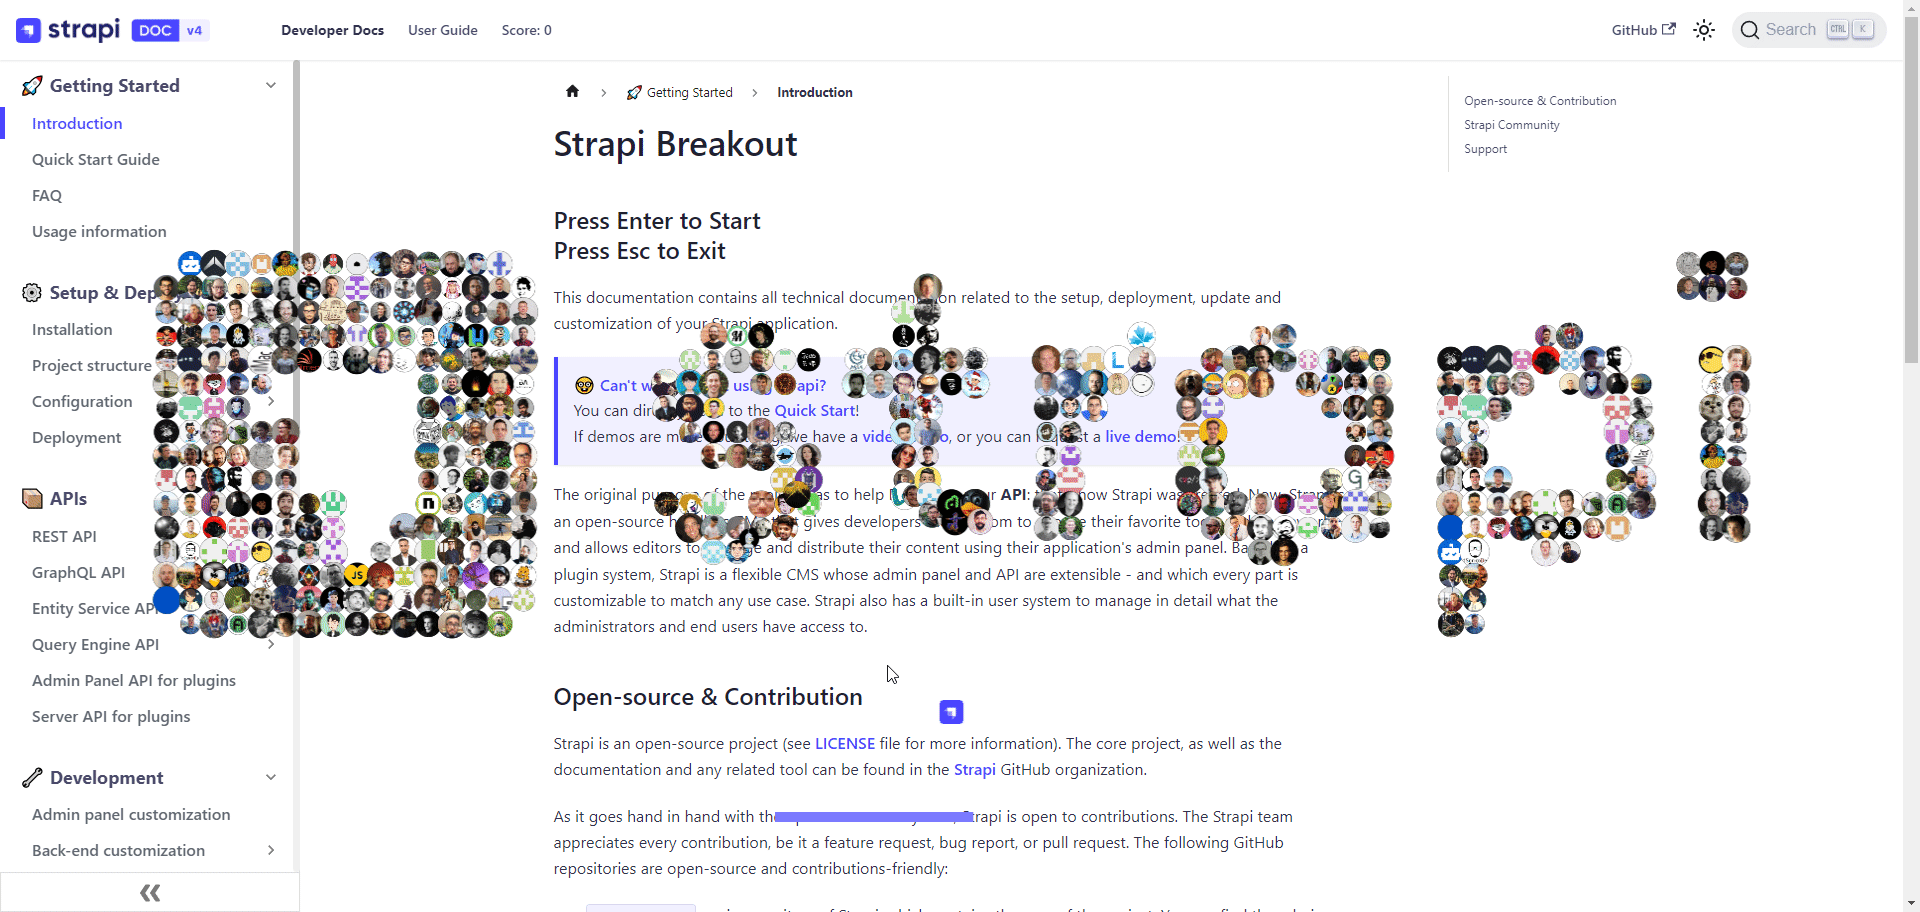
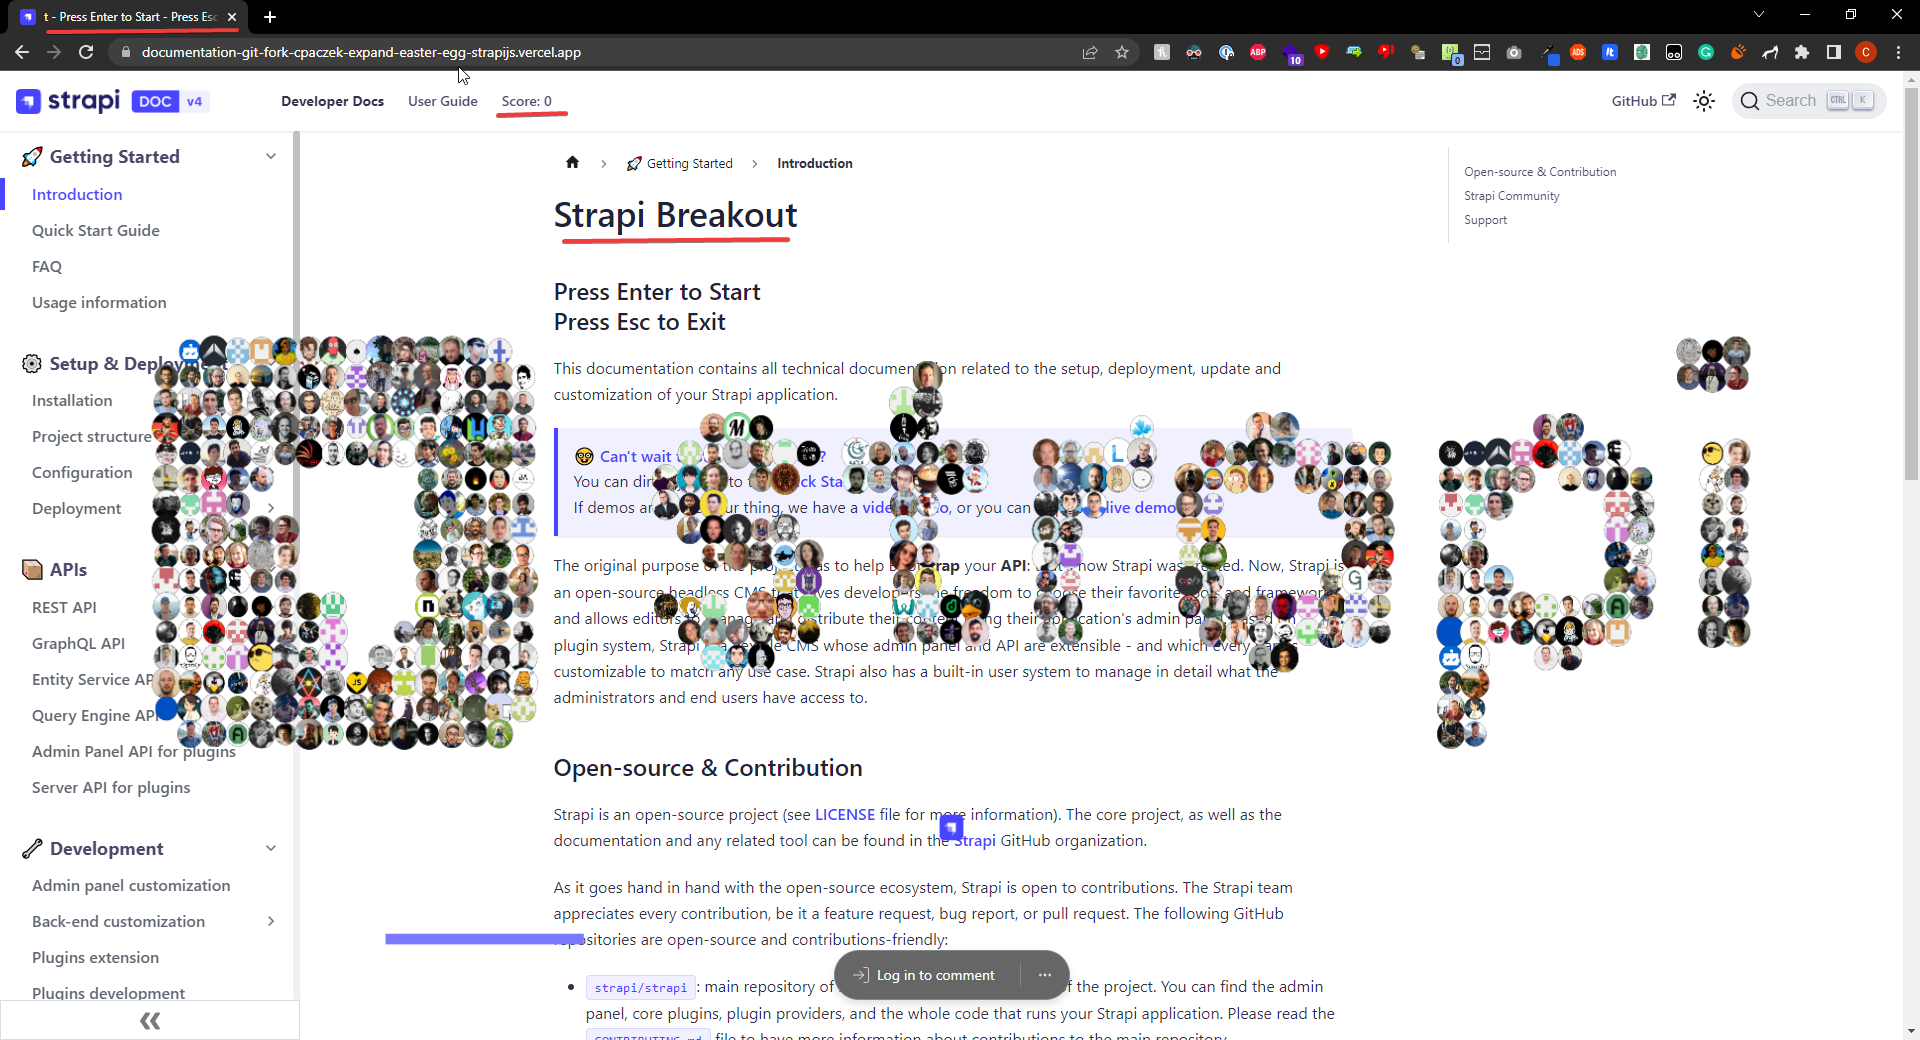
I recently built an easter egg for the Strapi Docs site. My initial motivation was to create a simple little easter egg that would be fun to watch but that soon spiraled out of control. I ended up building an entire game within the docs site that you can play. I will be going over the steps I took to build the easter egg and the challenges I faced along the way.
If you just want to play you can go to docs.strapi.io and enter the Konami code on your keyboard to play the game. (Up, Up, Down, Down, Left, Right, Left, Right, B, A)
First Iteration
My first iteration was a simple particle rain of all the contributor profiles on GitHub.
Getting Github Profiles
GitHub has a public API to get all the contributors for a repository but they limit it to 100 per page meaning we will need to make multiple requests to get all the contributors.
const profiles = []let page = 1while (true) { let res try { res = await fetch( 'https://api.github.com/repos/strapi/strapi/contributors?per_page=100&page=' + page ) } catch (e) { console.log(e) break } let data = await res.json() page++ data.forEach((profile) => { if (profile.avatar_url) profiles.push(profile.avatar_url) })}GitHub Rate Limit
This code will loop through all the pages of contributors and add the profile image to the array.
What I soon figured out was that GitHub has a rate limit so I easily hit that limit. To solve this problem I stored the profiles inside local storage like this:
const profiles = []if ( localStorage.getItem('profiles') && localStorage.getItem('profilesLastUpdated') && Date.now() - localStorage.getItem('profilesLastUpdated') < 1000 * 60 * 60 * 24 * 7) { // load profiles from local storage profiles.push(...JSON.parse(localStorage.getItem('profiles'))) console.log('loaded profiles from local storage')} else { // fetch all the profiles from github on all the pages let page = 1 while (true) { let res try { res = await fetch( 'https://api.github.com/repos/strapi/strapi/contributors?per_page=100&page=' + page ) } catch (e) { console.log(e) break } let data = await res.json() if (data.length == 0) { localStorage.setItem('profiles', JSON.stringify(profiles)) localStorage.setItem('profilesLastUpdated', Date.now()) break } page++ data.forEach((profile) => { if (profile.avatar_url) profiles.push(profile.avatar_url) }) }}This checks if the profiles are already in local storage and if they are it will load them from there. If they are not in local storage it will fetch them from GitHub and then store them in local storage. We also store the last time the profiles were updated so we can update them once a week.
Creating Particle Rain
After I have all the profile URLs I can create the particle rain. I used simple css animation in order todo this.
const profileDiv = document.createElement('div')profileDiv.className = 'profileRainContainer'document.body.appendChild(profileDiv)setTimeout(() => { profileDiv.remove()}, 10000)async function createProfile(url) { const profile = document.createElement('div') profile.className = 'profileRain' profile.style.left = Math.random() * window.innerWidth - 50 + 'px' profile.style.backgroundImage = `url(${url})` profileDiv.appendChild(profile) setTimeout(() => { profile.remove() }, 3000)}async function spawnProfiles() { profiles.forEach((url) => { let delay = Math.random() * 5000 setTimeout(createProfile, delay, url) })}spawnProfiles().profileRainContainer { position: fixed; top: 0px; width: 100%; height: 100%; z-index: 1000;}.profileRain { position: absolute; top: 0px; width: 50px; height: 50px; z-index: 1000; background-color: white; border-radius: 50%; background-image: url('https://via.placeholder.com/50x50'); background-size: cover; animation: rain 3s linear 1;}img.preload { display: none;}@keyframes rain { from { transform: translateY(-1000px); } to { transform: translateY(100vh); }}I had a profile container that I would add the profile images to. I then used a simple css animation to make the profile images fall down the screen. I also added a delay to the animation so that the profiles would fall at different times.
Activating The Easter Egg
I've been using the Konami Code for years to hide easter eggs and I wasn't stopping now.
const konamiCode = [ 'ArrowUp', 'ArrowUp', 'ArrowDown', 'ArrowDown', 'ArrowLeft', 'ArrowRight', 'ArrowLeft', 'ArrowRight', 'KeyB', 'KeyA',]let pressed = []window.addEventListener('keydown', (e) => { pressed.push(e.code) pressed.splice(-konamiCode.length - 1, pressed.length - konamiCode.length) if (pressed.join('').includes(konamiCode.join(''))) { rainProfiles() }})This code listens for the Konami Code and then calls the rainProfiles function.
Creating the Particle Logo
Although the particle rain was cool its wasn't Strapi enough. Thats when I discovered this CodePen
I decided that I could replace all the dots with each GitHub profile image. So I did a good o'l copy pasta and went to work figuring out how to replace the dots with the profile images.
The way the CodePen works is it uses HTML Canvas to draw each particle over and over again. The CodePen was using text but I wanted to use the Strapi Logo.
In the particle constructor I stored which image the Particle should use. I initially wanted to randomly select the images but due to the laws of probability it caused to many duplicates to show up.
// Particle Constructorthis.image = new Image()if (profileIndex >= profiles.length) profileIndex = 0this.image.src = profiles[profileIndex++]Then inside the Particle render function I clip the image to a circle and draw the image instead of using ctx.fillStyle
Particle.prototype.render = function () { // clip image to circle ctx.save() ctx.beginPath() ctx.arc(this.x, this.y, this.r, 0, Math.PI * 2, true) ctx.closePath() ctx.clip() ctx.drawImage(this.image, this.x - this.r, this.y - this.r, this.r * 2, this.r * 2) ctx.restore() ctx.fillStyle = '#000'}Mapping it onto the Strapi Logo
The CodePen used text to map the particles but I wanted to use the Strapi Logo. The good thing is all I had to do was swap out the text for an image, similarly to how I swapped out a color for an image for the particles.
const img = new Image()img.src = '/img/strapi.png'// Once the image is loaded, draw it on the canvasimg.onload = function () { const aspectRatio = img.width / img.height const padding = 300 const newWidth = ww - padding const newHeight = newWidth / aspectRatio // center the image ctx.drawImage(img, padding / 2, (wh - img.height) / 2, newWidth, newHeight) // Get the image data and create particles const data = ctx.getImageData(0, 0, ww, wh).data ctx.clearRect(0, 0, canvas.width, canvas.height) ctx.globalCompositeOperation = 'screen' particles = [] for (let i = 0; i < ww; i += Math.round(ww / 80)) { for (let j = 0; j < wh; j += Math.round(ww / 80)) { if (data[(i + j * ww) * 4 + 3] > 80) { particles.push(new Particle(i, j)) } } } amount = particles.length}This code first loads the Strapi Logo then does some math to maintain the aspect ratio and add padding to each side. We then use ctx.getImageData() which returns an array of all the pixel data currently rendered on the canvas.
We then want to split the canvas into a grid because if we drew a particle on every pixel your computer would probably catch on fire.
This i += Math.round(ww / 80) will make a new box every 80px. this will go row by row until we have a grid. Then if the grid has more than 80 pixel in that grid then we want to want to draw a particle.
We now have a particle logo with images!
Building Breakout
After this, Paul (A Strapi Team Member) suggested I turn it into a breakout game. Little did he know that that suggestion caused me to lose 20 hours of my life over the next 2 days. (jk ♥ you Paul)
So I went to work and found this guide which gave me a good starting point.
Good news is I already had a canvas so it was pretty easy to expand it.
But first I needed to organize my code putting all of this into 1 file would be a nightmare.
I created 5 classes
- Ball
- Bar (Paddle is a better name but im too lazy to refactor)
- Firework
- Game
- Particle (Same class as from the code pen)
I am only going to go over the Ball, Bar and Main JS code as Firework, Particle and Game code is pretty simple. If you want to see all the code you can view my Pull Request
Then I had the main js file as before.
Design
I've never really done game development before. I've made a couple games in LibGDX back in the day but I definitely never built a game from scratch without any utilities.
Rules: Each Object is responsible for it's own rendering. i.e ball will have a render function which will draw itself on the screen. Each Object is responsible for it's own physics. i.e ball should know if it's colliding into a wall and bounce off Each class should contain all of its objects. Instead of storing the objects in some variable it will be stored in a static variable in the class. This means if we want to get the particles all we need to do is Particle.particles and this will return an array of particles.
Coding the Ball
The ball is probably the most difficult class to code as the ball interacts with every object.
The ball has a few properties that you should know the first being x and y which is the current position of the ball and dx and dy which is change (delta) i.e how much x and y changes each frame.
ww and wh is the canvas width and canvas height. I probably should of renamed these but it was legacy code from the CodePen so I didn't want to do that refactor. (Again I'm lazy)
Bouncing off the walls
// bounce off the sides of the screenif (this.x + this.dx > this.ww - this.radius || this.x + this.dx < this.radius) { this.dx = -this.dx}// bounce off the top of the screenif (this.y + this.dy > this.wh - this.radius || this.y + this.dy < this.radius) { this.dy = -this.dy}When we do this.x + this.dx this corresponds to where the ball will be on the next frame. so we check if on the next frame it will be past the boundaries of the canvas and if it is we invert the delta causing the ball to bounce.
Bouncing off of the bar
This code is a bit more complex as if you have every played breakout the bar can bounce the ball in different ways and make the ball change direction.
if ( this.y <= this.bar.y && // ball previous frame is above the bar this.y + this.dy >= this.bar.y && // ball next frame is below the bar this.x > this.bar.x - this.radius && this.x < this.bar.x + this.bar.barWidth + this.radius) { this.dy = Math.max(-this.dy - this.speedMargin, -this.speed) let barCenter = this.bar.x + this.bar.barWidth / 2 let ballCenter = this.x + this.radius let distanceFromCenter = barCenter - ballCenter // get distance from center as a percentage of the bar width from -1 to 1 let distanceFromCenterPercentage = distanceFromCenter / (this.bar.barWidth / 2) // dx should have a random speed within the speedMargin // get random number between -speedMargin and speedMargin let randomSpeed = Math.random() * this.speedMargin * 2 - this.speedMargin this.dx = this.speed * Math.min(Math.abs(distanceFromCenterPercentage), 0.5) + randomSpeed}We first check if the ball will collide with the bar using the same logic as the wall but we use the bar's current position instead of a fixed position.
I then wanted to add some randomness to it to prevent the ball from getting stuck in a loop so we use a speedMargin to add some randomness to the speed.
We then use the distance from the center of the bar and multiply that by our speed to change the x velocity. The closer you are to the edge of the bar the faster it will go. With the slowest the ball can go is speed/2 + speedMargin
Game Over
The game over code is simple we just check if the ball is below the bar then trigger game over
// canvas y is upside down hence the > and not <if (this.y > this.wh - 25) { game.gameOver = true game.active = false}Breaking Particles
On each render we loop through all of the particles and see if the ball is colliding with it. We then can also check if which side we bounced off so we can change the direction accordingly.
for (let i = 0; i < particles.length; i++) { let particle = particles[i] if ( this.x + this.dx > particle.x - this.radius && this.x + this.dx < particle.x + this.radius && this.y + this.dy > particle.y - this.radius && this.y + this.dy < particle.y + this.radius ) { // bounce off of the particle depending on which side of the particle the ball hit Check for top bottom left and right if ( this.x + this.dx > particle.x - this.radius && this.x + this.dx < particle.x + this.radius && this.y + this.dy > particle.y - this.radius && this.y + this.dy < particle.y + this.radius ) { // bounce off of the particle depending on which side of the particle the ball hit // if it hits the side the keep th y velocity the same and change the x velocity // if it hits the top or bottom then keep the x velocity the same and change the y velocity if ( this.x + this.dx > particle.x - this.radius && this.x + this.dx < particle.x + this.radius ) { this.dy = -this.dy } else { this.dx = -this.dx } } // destroy the particle particle.destroy() // if there are no more particles then the game is over if (Particle.particles.length === 0) { game.gameOver = true game.active = false } }}Moving the Ball
We then can finally move the ball by incrementing the x and y value by their deltas
this.x += this.dxthis.y += this.dythis.drawBall(ctx)Coding the Bar
The bar is thankfully much simpler than the ball.
Moving the bar
We can move the bar by arrow keys or the mouse using this code:
if (Game.leftPressed) { this.x -= this.movementSpeed}if (Game.rightPressed) { this.x += this.movementSpeed}if (Game.mouseMoveEvents > 100) { this.x = Game.mouse.x - this.barWidth / 2}The reason why we check if the mouseMoveEvents is > 100 is that if you are using keyboard controls and you bump your mouse I didn't want the bar to move to a different part of the screen causing you to lose.
Every time you press a key it will reset the movement count which means if you want to switch back to the mouse you need to shake it around for a second before it will pick back up.
Bar Collision
We then need to make sure the bar doesn't go off the screen
if (this.x < 0) { this.x = 0}if (this.x + this.barWidth > this.ww) { this.x = this.ww - this.barWidth}Putting It All Together
We first do all the stuff I mentioned before with grabbing the GitHub images and drawing the particles to the screen.
Setting Up DOM
You may have noticed there are some DOM elements that have been updated
We do this with some basic JS but also make sure to store the original value so we can reset everything back to normal
function setupDom() { document.querySelector('.navbar__items').appendChild(score) // change all h1 tags to say "Strapi Breakout - Press Enter To Start" document.querySelectorAll('h1').forEach((h1) => { // store the original text in the data-original-text attribute h1.setAttribute('data-original-text', h1.innerText) h1.innerText = 'Strapi Breakout' // add smaller instructions below in an h2 const h2 = document.createElement('h2') h2.innerText = 'Press Enter to Start \n Press Esc to Exit' h1.parentNode.insertBefore(h2, h1.nextSibling) }) //store the original title in the data-original-title attribute document.ogTitle = document.title // animate document title with a marquee saying "Strapi Breakout" with padding document.title = `Strapi Breakout - Press Enter to Start - Press Esc to Exit- ` // animate title let title = document.title let titleLength = title.length let titleIndex = 0 titleInterval = setInterval(() => { titleIndex++ if (titleIndex > titleLength) { titleIndex = 0 } document.title = title.slice(titleIndex) + title.slice(0, titleIndex) }, 200) // set scroll to top window.scrollTo(0, 0)}Creating All the Game Objects
We then need to create all the game objects
Particle.particles = []for (let i = 0; i < ww; i += Math.round(ww / 80)) { for (let j = 0; j < wh; j += Math.round(ww / 80)) { if (data[(i + j * ww) * 4 + 3] > 80) { Particle.particles.push(new Particle(i, j, ww, wh, game)) } }}for (let i = 0; i < 100; i++) { const x = Math.random() * ww const y = Math.random() * wh const size = Math.random() * 25 + 10 const color = `${Math.floor(Math.random() * 256)},${Math.floor(Math.random() * 256)},${Math.floor( Math.random() * 256 )}` Firework.fireworks.push(new Firework(x, y, size, color))}bar = new Bar(ww, wh)ball = new Ball(ww, wh, bar)window.bar = barwindow.ball = ballI am not going to be going over the fireworks so if you want to see them I guess you will have to beat the game.
Rendering Everything
To render everything we have a recursive render function that uses requestAnimationFrame()
We first check that the game isn't running at more than 60 fps as game speed is tied to framerate. The proper way to do this is a tick system but I didn't see the point in implementing that in such a simple game. This does mean that if you have really low fps the game will run slower.
let then = Date.now();const fps = 60;const interval = 1000 / fps;function render(a) { // console.log(rendering) if (!game) return; // cap the framerate to 60fps const now = Date.now(); const delta = now - then; if (delta < interval || !rendering.value) { requestAnimationFrame(render); return; } //...We then clear the canvas in anticipation of drawing a new frame
ctx.clearRect(0, 0, canvas.width, canvas.height)Now we render all the game objects
for (let i = 0; i < Particle.particles.length; i++) { Particle.particles[i].render(ctx, game.active, game.gameOver)}bar?.render(ctx)ball?.render(ctx, game)Because each object has its own render function we just call the render function and pass in the canvas 2d context and it will draw itself on the screen.
We then can use this if statement
if (game.gameOver && Particle.particles.length === 0)to check if the game is won and draw render the fireworks and You Win text
for (let i = 0; i < Firework.fireworks.length; i++) { Firework.fireworks[i].update(ctx) Firework.fireworks[i].render(ctx) // Remove the firework from the array if it has finished exploding if (Firework.fireworks[i].isFinished()) { Firework.fireworks.splice(i, 1) i-- }}//...ctx.strokeText('You Win', ww / 2, wh / 2)ctx.fillText('You Win', ww / 2, wh / 2)//...ctx.strokeText(`Score: ${game.score}`, ww / 2, wh / 2 + 50)ctx.fillText(`Score: ${game.score}`, ww / 2, wh / 2 + 50)Then if the game is over and the particles array is not empty that means the player lost.
else if (game.gameOver) { //... ctx.strokeText("Game Over", ww / 2, wh / 2); ctx.fillText("Game Over", ww / 2, wh / 2); /... ctx.strokeText(`Score: ${game.score}`, ww / 2, wh / 2 + 50); ctx.fillText(`Score: ${game.score}`, ww / 2, wh / 2 + 50);We then have some other boring logic for resetting the game and such.
Hacking Strapi Breakout
I export all of the game objects and classes to the chrome console so you can try and hack the game instead of playing it fairly. 😈😈😈
     _____  __                       _
    / ___/ / /_ _____ ____ _ ____   (_)
    \__ \ / __// ___// __ `// __ \ / /
   ___/ // /_ / /   / /_/ // /_/ // /
  /____/ \__//_/    \__,_// .___//_/
                         /_/
      ____                      __                  __
     / __ ) _____ ___   ____ _ / /__ ____   __  __ / /_
    / __  |/ ___// _ \ / __ `// //_// __ \ / / / // __/
   / /_/ // /   /  __// /_/ // ,<  / /_/ // /_/ // /_
  /_____//_/    \___/ \__,_//_/|_| \____/ \__,_/ \__/

---------------------------------------------------
|  Welcome to the Strapi Breakout Game!
|  Made with ♥ by https://github.com/cpaczek

|  Use the Arrow/AD keys or Mouse to move the paddle.
|  Press Enter to start the game.
|  Press Escape to exit the game.
---------------------------------------------------
|  Secret Menu:
|    Press P to toggle rendering (i.e pause the game).
|    Change the speed by typing in the console: ball.speed = 15
|    Exported Game Objects:
|      - ball
|      - bar
|      - game
|      - Particle (Class)
|      - Firework (Class)
|      - Game (Class)
|      - Bar (Class)
|      - Ball (Class)
---------------------------------------------------
Good Luck!
Conclusion
I hope you enjoyed this tutorial and learned something new. I had a lot of fun making this game and I hope you have fun playing it. I made this game over the course of 2 days so its not perfect but its good enough™ for an easter egg.
If you want to play you can go to docs.strapi.io and enter the Konami code on your keyboard to play the game. (Up, Up, Down, Down, Left, Right, Left, Right, B, A)